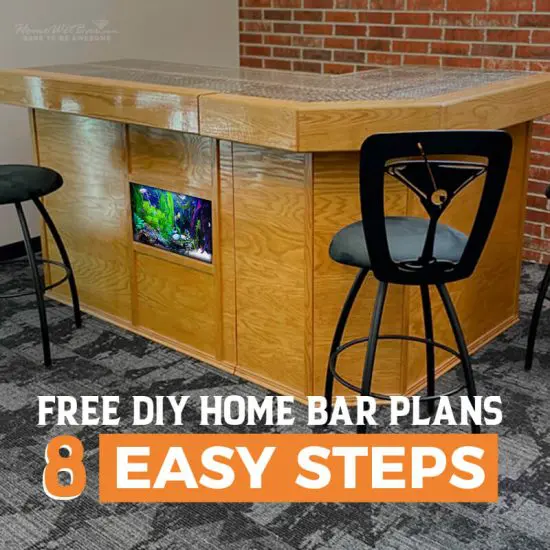
To commemorate our 10 year anniversary, we are making our Official HomeWetBar.com wet bar plans free! Yes, you heard that right! The famous home bar plans that started it all are now free. It’s our way of saying thanks for the last 10 years of providing you with the most unique and fun items on the internet. Whether you chose to build a basement bar, an indoor bar, or modify these plans into a tiki bar, we hope you have as much fun building your own bar as we had making the original. Cheers!
Getting Started…Bar Building Supplies Checklist
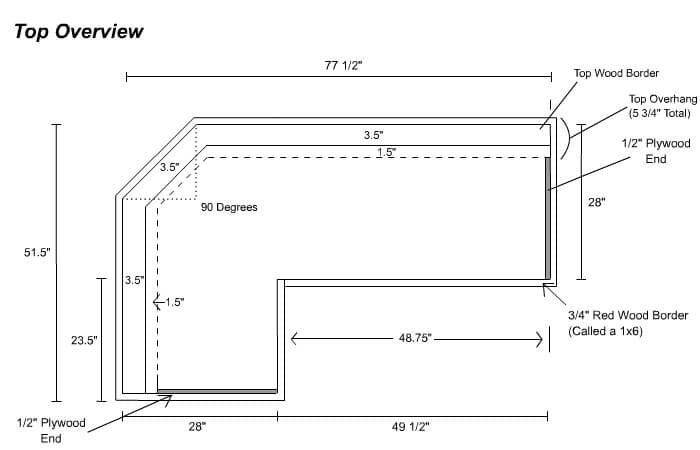
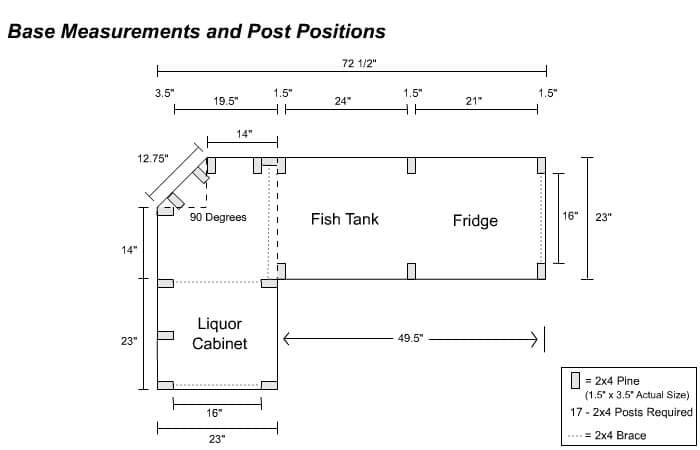
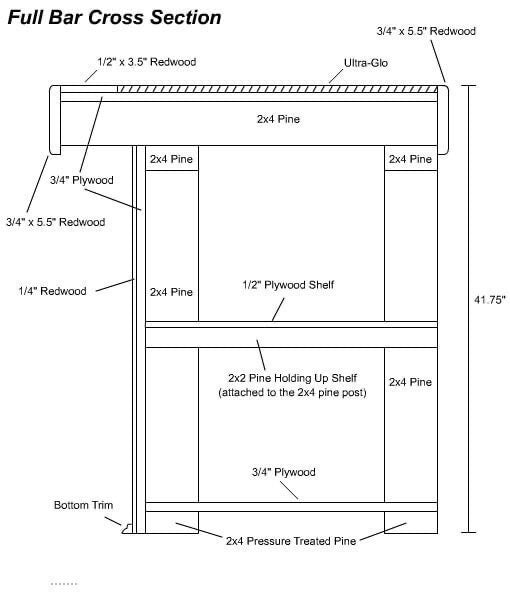
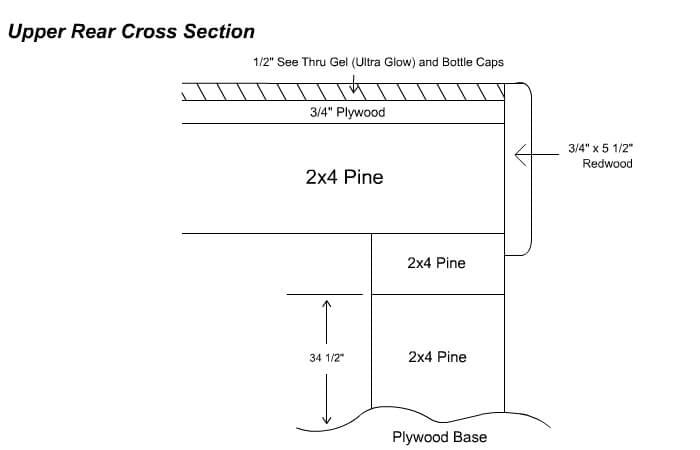
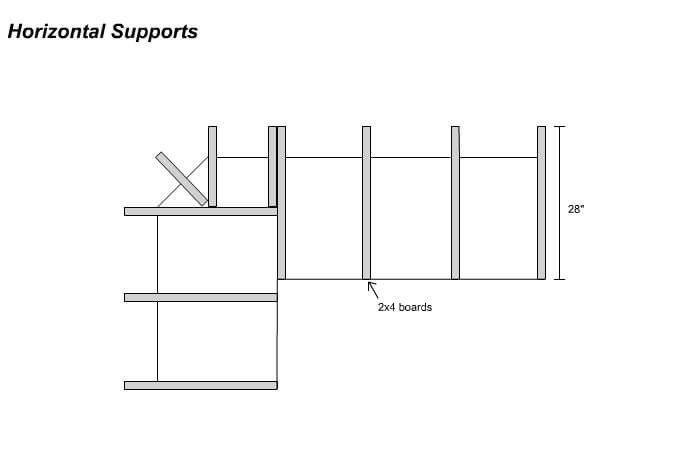
Start by examining the diagram and bar designs provided. You should have six diagrams: Base Measurements and Post Positions, Top Overview, Upper Front Cross Section, Upper Rear Cross Section, Bar Cross Section, and Horizontal Supports. The Base Measurements and Post Positions diagram will help you when building the bar base and placing the posts. The Top Overview is an eagle’s eye view of the top of the bar. The Upper Front Cross Section, Upper Rear Cross Section, and Bar Cross Section diagrams should convey to you how the bar is built from the base on up to the top. Finally, the Horizontal Supports diagram should give you an idea of how the upper level of 2x4s (discussed later) is constructed.
Essential Tools and Equipment You Will Need
Circular Saw or Table Saw
Powered Drill
Drill Bits
Screw Bits (for a drill)
Protective Eyewear
Calking Gun
Sand Paper (60, 150, & 240 Grit)
Plastic Tarps
Latex Gloves (for staining)
Torch (for Ultra-Glo)
Hammer
Saw Horses
Clamps
Tape Measure
Masking Tape (1 ½ Inch or 2 Inch)
Cotton Cloth Rags
The bar you will be building! – The Original Home Wet Bar
Some things you should realize before starting to build your own bar:
I am not an architect, so although I may have different ways of doing things, they work, the proof is in the pudding (or in this case the bar). Secondly, if you think you should change something in these free bar plans to make the bar even better, feel free to, but realize you will have to adjust the bar designs and diagrams yourself to account for your changes. HOWEVER, I encourage utilize your own home bar ideas to make it more of your own unique creation, not just a carbon copy of my bar; after all this is YOUR OWN BAR!
I am assuming you know how to read and follow directions, and not just these directions; you should always read and follow all directions on the products you use to create own your bar. If you are unsure how to do something such as cutting or staining be sure to ASK someone at the local hardware store where you purchased the item, they are normally very helpful and knowledgeable, it is better to spend the time doing something right the first time instead of having to redo it!
Many times the size of wood and what it is referred to as are different, for example a 2×4 is really 1½”x3½”. Whenever possible I have tried to note this for you but try to remember this, it can be very important.
This homemade bar cost me $1500-$2000 to make, but you can make it much cheaper if you opt to not do certain things such as using pine on the redwood parts, leave off the fish tank, or not using Ultra-Glo on the top.
I am assuming you have basic knowledge of woodworking (For example, I assume you know how to use power tools and know to drill holes before screwing screws in!).
This is meant to be a home wet bar, not a commercial bar. It is sturdy as hell but is not made to take the 24/7 abuse like a commercial bar does.
We are building a BAR, so I tried to make it as waterproof as possible. This means that when I refer to using screws be sure to use outdoor / exterior screws that will not rust, we will always use waterproof glue, and we will try to build this bar as sturdy and waterproof as possible so don’t get cheap on me, it will only lead to problems later!
This can be used as an outdoor bar, or basement bar, but it will last longer when kept under cover or indoors. For more cool home bar inspirations I suggest you checkout our 71 awesome home bar ideas article here.
Step 1: How to Build a Bar Base
Picture 1a
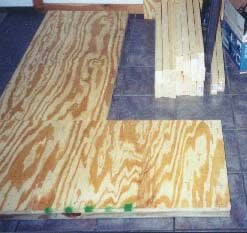
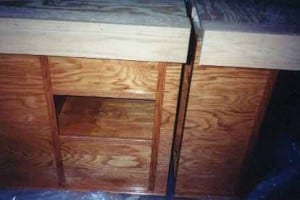
Building a great basement bar starts with a sturdy base. It is arguably the most important thing when building a bar, the stability of the entire bar depends on it. As you can see from picture 1a I chose to make my bar in two pieces so it could be transported if I ever choose to move. Each section is actually a little bit smaller than the main door opening in standard home so it can be moved through the door easily.NOTE: These same dimensions should work for you as well, but it would be wise to measure your door and compare it to the dimensions on the diagrams to be certain that each of the bar sides will fit through the outside door in your home. (A 30” wide doorway is required for the dimensions of this homemade bar.)
Picture 1b
Our bar designs call for using 2×4 treated pine to help protect it from spills and then is covered with ¾” plywood (picture 1b). You should use waterproof glue to attach the 2x4s to the plywood and then use 1 5/8” exterior wood screws to hold the 2x4s and plywood together and add strength.
Step 2: Building a Bar Internal Frame
The interior skeleton of our diy bar is made of pine 2×4 pieces. Our home bar plans call for seventeen 2×4 posts of equal height. They should all be cut to exactly the same height, 34 ½” tall, or the bar top will not be level. They should then be attached at the designated areas (See Base Measurements and Post Positions diagram) using one 90 metal angle brace for each post to help anchor it down.In order to attach the brace to the post, mark where the post will go on the base and where the screws for braces will go on the base and posts. Drill the holes for the brace, and then attach one end of the 90 metal angle brace to the post. Next, add glue to the bottom of the post and screw the other end of the brace into the base using 1 5/8” screws. Finally, drill holes through the base into the posts from the bottom, and screw in (2) 3 ½” exterior screws. Repeat for all posts.
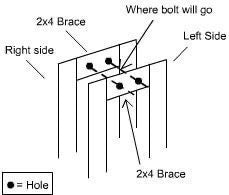
Diagram 2a
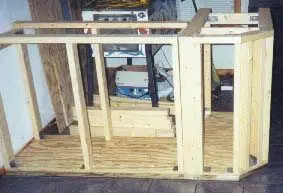
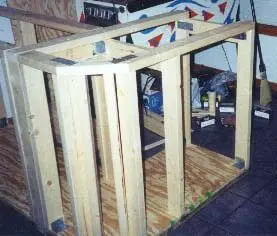
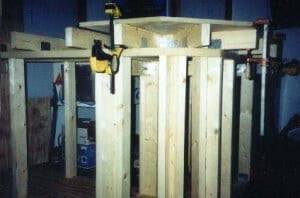
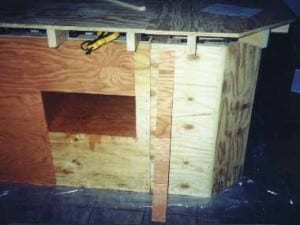
Next, cut four 16” long 2x4s braces to go in-between the front and rear posts to add strength. Use glue and the flat metal braces to attach the 2×4 braces to the posts. (See Base Measurements and Post Positions diagram – The 2×4 post-braces are denoted by the light dotted lines). Now drill holes for the two large bolts that will hold the bar together in the two top 2×4 braces that meet from each section. (Diagram 2a)After that, add the first level of 2x4s that lay flat on top of the posts to build an upper frame (pictures 2a & 2b), attach them by putting glue on top of the post and then drill holes down into the post and use (2) 3 ½” exterior screws to attach each post to the upper frame.
Picture 2a
Picture 2b
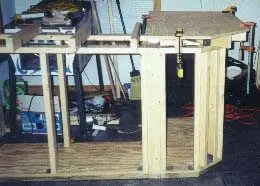
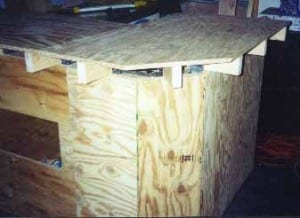
Finally, add the 2×4 horizontal supports to the upper frame (shown in Horizontal Supports diagram). Seven of these upper supports will be 28” and you will calculate the other three to fit your exact bar dimensions. Assuming that everything is the same length and width as the dictated in the diagrams you should just have to measure the distance from where the calculated 2×4 will touch one of the 28” long 2x4s and then add 5”. This should give you 5” inches of overhang all around the front of the bar. Attach the upper 2×4 horizontal supports using glue and (4) 90 metal braces on each horizontal support. (Pictures 2c & 2d)
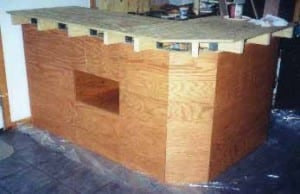
Our bar plans call for two layers of plywood to give it strength. The idea for the bar skin is that the interior ¾” plywood will give it plenty of strength, and the more expensive ¼”redwood exterior will give it beauty. The diy bar top is simply cut to the length of the upper horizontal 2x4s. The easiest way to measure the top is to just set the each side of the bar base on a large piece of plywood, outline it, and then add 5” to all of the front side measurements and then cut out the new dimensions. But if you are off even a little bit the top will not fit properly so I suggest you measure to the end of all of your 2x4s and compare those measurements to those on outline to make sure they are the same. You could even go as far as laying the plywood on top of the bar and using a ruler to trace lines underneath to outline where you need to cut if the other methods don’t work for you. To attach the plywood top you need to drill holes down trough the plywood into the 2x4s. Then, glue the plywood to the 2x4s and fasten the plywood to the 2x4s with 1 5/8” screws. Use clamps to hold the top down while drying. (Pictures 2c and 2d)
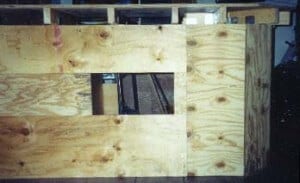
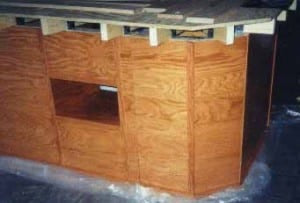
For the ¾” plywood bar sides you just need to measure out each of the pieces and make sure to leave a cutout for the fish tank centered in the 23” spot designated for the tank. The actual cutout for the tank is 11”x 19½” and is 16” from the ground on my homemade bar because I used a 10 gallon tank. To attach the sides drill holes trough the plywood into the 2x4s and then add glue and attach the plywood to the 2x4s with 1 5/8” screws. (Pictures 3a and 3b)
Finally, on the two ends of the bar I used ½” plywood, and stained it and waterproofed it in the same way as the ¼”redwood skin discussed below. (The ½” plywood ends are shown on the Top Overview diagram)
Picture 3b
Picture 3b
Step 4: Adding the Exterior Bar Skin and Trim
NOTE: I chose to do this before adding the top to the bar because I thought the overhang of the top might get in the way, you can do step 4 or 5 in either order.
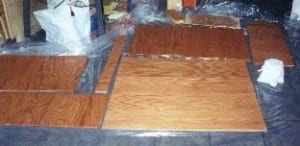
I cut out ¼” redwood panels to fit over the interior skin to give our homemade bar the look of redwood. Next, I sanded and stained them using Oil based wood stain (I chose the color Ipswich pine, but you can you whatever you like). (Picture 4a) I then attached the panels to the interior ¾” plywood using generous amounts of glue, finishing nails, and clamps to hold the boards in place while they dried. (Pictures 4b and 4c)
Picture 4a
Picture 4b
Picture 4c
Picture 4d
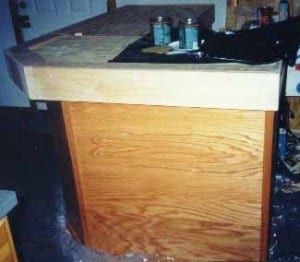
I then cut the trim to fit the home bar and overlapped the fish tank area by about ½” on all sides so you couldn’t see the edges of the glass. I then stained the bottom trim and attached it using glue and finishing nails. (Picture 4d) Finally, I applied four coats of Minwax Helmsman Spar Urethane Clear Gloss over the entire exterior of the our diy home bar (including the plywood ends) to give it a waterproof coating that would last.
Step 5: How to Build a Bar Top
In this step our home bar plans call for adding a ¾” x 5½” redwood trim (referred to as a 1×6) all around the sides of the bar top and the ½” x 3½” redwood trim on top of the bar (referred to as a ½ x 4) for the border on the front. (Refer to Front, Rear, and Top diagrams and pictures 5a and 5b) I then used a router to round off the top and bottom edges of the entire top border to give it a more professional look. (Picture 5c)
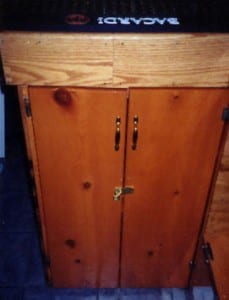
This is also when I made the doors for the liquor cabinet and routed them. I used two doors and each door is made out of ¾” solid pine (referred to as 1”); they are 11” wide and 36” tall each. After cutting the boards out I then routed the outer door edges to give a more finished look.
Next, I used wood filler to fill all of the small cracks and gaps, and I then painted the top plywood that was showing black to show off the bottle caps. NOTE: Be sure to mask off the redwood before painting the top to avoid getting black paint on it. I then sanded and stained all of the redwood and the cabinet doors for the wet bar. Finally, I applied three coats of the waterproof sealer to the doors on both sides.
Picture 5a
Picture 5b
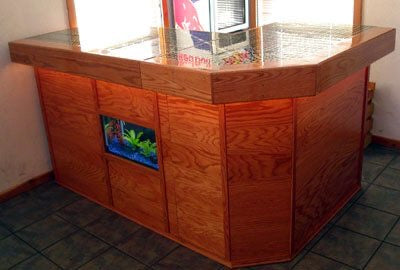
Our DIY home bar doesn’t look so homemade now does it?
Step 6: Finishing the Bar Interior
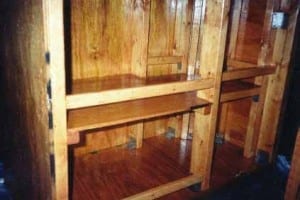
Our plans for how to build a bar would be complete without a liquor cabinet now would they! For the inside of the bar where the fish tank sits I cut ½” plywood (2 pieces – 23”x 34 ½”) and attached it to the 2x4s on both sides of the tank area to make walls in the bar. (Picture 6b) I then made shelves using 1×2 pine screwed into the 2x4s to form the base and then ½ plywood to make the shelf itself. (Pictures 6a & 6b) I then used 1×2 pine to make rails so the liquor would not fall out of our home bar from the back of the shelf and ½ x 2 pine to make the front rail that keeps the liquor from falling out when you open the doors. You can see this in Picture 6a; it is of the left side of the bar (liquor cabinet side). Take care when making your shelf for the right side, make sure you line it up so the fish tank will be visible only, and no other space will be showing. Now you need to sand and stain the inside of the bar, and then apply 3 coats of the waterproof sealant to the wood.Finally, put in the window from the backside of the bar, it is just 1/4” thick glass custom cut for the hole in my bar (11”x 19½”) by a local glass shop. It is attached by see-thru calking applied to the back of the glass and plywood to form a tight, waterproof bond all the way around the glass.
Picture 6a
Picture 6b
Step 7: Finishing the Bar Top
The first step in finishing the bar top is to apply 2 coats of Ultra-Seal to the plywood and the redwood on the top and the top trim, one coat in each direction. This seals off some of the pours in the wood so it won’t bubble as much later when we apply the Ultra-Glo. The second step is to apply a third layer of Ultra-Seal to the plywood and stick your bottle caps to it. The way I recommend to build a bar top you’ll like is to first layout all of your bottle caps where you want them and then pick them up in small sections and glue them all down, and then move to the next section. Next you should check all of the bottle caps to make sure they are secure and re-glue down any of the loose ones. Now we are ready to prepare for the Ultra-Glo.
IMPORTANT DIY HOME BAR BUILDERS: Before pouring the Ultra-Glo be sure to thoroughly read the directions and be sure to have a torch ready as the directions say. I tried to use a blow dryer the first time I poured the top (hence the picture) and it did not get out all of the bubbles! Now you will need to make two pours of this stuff at different times, about half the first time and the rest the second time (assuming you pour both sections at once). The reason for this is that when Ultra-Glo is poured too thick it heats up too much internally and it causes excessive bubbles that will continue to bubble even when the top sets leaving you with bubbles you can not get out. This happened to me the first time I poured my bar when I poured it too thick because no one seemed to know this except the people at Ultra-Glo; it is not even in the directions! Needless to say I spent countless hours re-sanding the top and cutting out bubbles! Take my advice and make two pours.
To setup for the pour I just separated the two bar pieces and taped both the their ends off with masking tape and then I staple gunned cardboard behind the tape into the lower plywood to give it strength so the Ultra-Glo did not overflow. I then made sure the pieces where level because Ultra-Glo is self-leveling so if the piece was not level you would have problems making the bar top even. I then poured the Ultra-Glo with the help of my roommates; one mixes while the other person or two smoothes and gets the bubbles out. This stuff is really messy so I recommend you put a tarps under everything and over the sides of the bar and you should also wear old clothes and disposable gloves. While it is drying to get the bubbles out you can quickly wave the torch over them to make them pop. On the second pour you will want to pour up to the top of the redwood and use a stirring stick to push the Ultra-Glo evenly over all of the redwood top and spread it over 1×6 redwood border, this is when the 2nd or 3rd person really comes in handy. (Picture 7a) All total the bar took about 5 gallons of Ultra-Glo but plan to have extra on hand just in case. You should be able to find Ultra-Glo and Ultra-Seal at your local hardware store or you can save some money by ordering Ultra-Glo online from Tap Plastics.
Buddies helping finish the bar top
If you followed our home bar plans, you will have built your DIY bar in two pieces. Sand the sides of the top where they meet if necessary in order to make them fit together smoothly. Do not sand the top surface or you will have to re-pour
Bolt the bar together
Attach the doors to the liquor cabinet using hinges by attaching one side to the left bar section and one door to the right bar section (Picture 8a).
Place the Mini-Refrigerator and the fish tank in the bar.
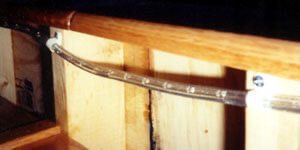
Add any other personal touches that you please! Some additional extras I added are a rope light that goes around the front of the bar (Picture 8b), a surge protector to plug things into (like a blender), and a bottle opener, but feel free to add whatever extras you want.
HAPPY BUILDING!
Bar Liquor Cabinet
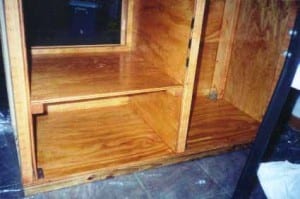
View from under bar overhang
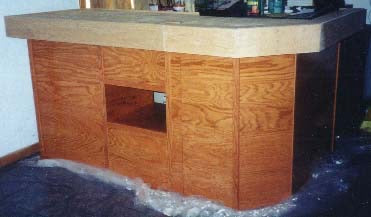
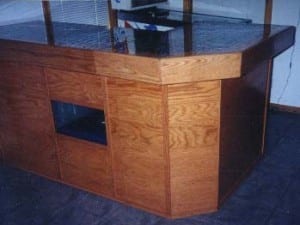
Finished Bar Design from Front
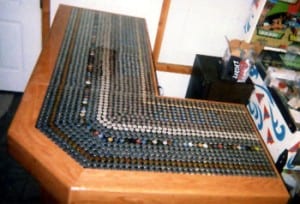
Finished Bar Designs on the Top
NOTE: These bar building instructions and drawings are the copyrighted by Keith Winter and HomeWetBar.com, they may not be republished without the written consent of Keith Winter. You are free however to use these wet bar plans for creating your own DIY home bar! Cheers!
Keith Winter is renowned gift expert. His gift collaborations and designs have enriched over 1.3 million lives. He has a unique insight into the art of gifting, with his 20+ year history. In 2023 he achieved certification in the “The Art of Luxury” from the prestigious Parsons Designer School of Paris and has participated in design workshops at Chanel Paris. He has appeared on TV shows and collaborated with multiple brands as a gifting expert. Keith has a reputation for unmatched knowledge in finding gifts that leave a lasting impression.