What Do You Know About Grilling the Perfect Steak?
First of all, you probably want to know who I am and why you should listen to me. My name is Keith Winter, and I am the founder of HomeWetBar.com. Born in the Midwest and growing up in a family of cattle ranchers and auctioneers, well… lets just say I know I little bit about what makes a great steak. We grew up eating steak three days a week, every week. Over the years I’ve honed my crafted and come up with the perfect recipe for grilling the perfect steak every time. I make my own seasoning and rubs, and always buy my steaks from the butchers counter. I know steak, and in the next 5 minutes I’m going to teach you how to grill a perfect steak every time. Grilling the perfect steak – the kind your neighbors wish they could – is all about basics. As you’ll soon see, “less is more” really applies to your summer grill.
Ready to get started? Then roll up your sleeves – things are about to heat up.
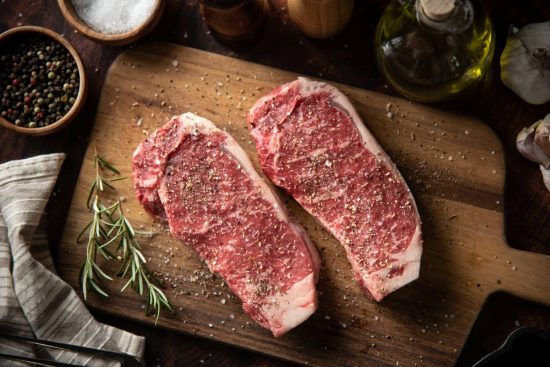
Step #1 Choose the Right Meat
This is by far the most important step. Grilling the perfect steak starts with the right Beef. Even the greatest chefs can’t turn dog food into delicacy. When choosing your steak, use the USDA ratings:
Select: The lowest quality found in supermarkets. Select is better used for roasts than grilled steaks.
Choice: A quality cut with tenderness and marbling. A perfectly acceptable (and popular) grade of meat for grilling.
Prime: The highest quality possible. Only 2% of beef meets this USDA grade. Prime steaks have the most marbling, texture and flavor.
If you’re looking to grill the perfect steak, nothing less than Prime grade beef will do.
Of course, there are different cuts of meat, too.
Filet: The most tender cut. Due to less marbling, it doesn’t have the flavor as other cuts, but it’s still regarded as a quality cut.
Ribeye: The most flavorful cut. However, all that marbling puts the ribeye on the fatty side.
NY Strip: Is a compromise between a filet and ribeye. It’s more flavorful than a filet and more tender than a ribeye. A firm meat with good flavor
T-Bone / Porterhouse: The bone adds flavor while the tenderness of the filet can be found on the smaller side and the robust flavor of the Strip steak can be found on the other side of the bone. The main difference between a T-Bone and Porterhouse is the Porterhouse is thicker (at least 1.25″) according to the USDA.
PRO TIP: If you’re unsure Filets are always a crowd pleaser. However my favorite is Ribeye for the flavor.
And don’t forget aging…
One thing that pros know that the average consumer may not, is that aged beef not only is more tender, it’s also more flavorful. There are basically two types: Wet Aged and Dry Aged
Wet aged: The beef is aged in it’s on juices inside of a bag. You see this a lot at fine dining restaurants because it’s generally cheaper due to the beef not lose as much mass as it does during dry aging. That being said, a prime wet aged steak will knock the socks off a non-aged prime steak any day of the week. Additionally some steaks like flat iron or skirt lack the mass to dry age so they must be wet aged or you’ll end up with something similar to a dried out stick of beef jerky when you go to cook it.
Dry aged: The choice of kings! This aging method allows the meat to breathe while it slowly loses water and breaks down the beef increasing it’s “beefiness” since there is now less water and it’s tenderness is increased. A true delight to eat.
PRO TIP:Make sure to get it cut around 1.25″ thick, any thinner than 1″ your steak won’t be juicy, thicker than 1.5″ is really hard to cook, 1.25″ thick is the sweet spot for most cooks.
PRO TIP:You will almost always get the best quality steaks at a butcher’s shop instead of a supermarket. Go aged Prime grade if you can, or choice if prime is not an option for you.
Step #2: Seasoning the Steak
You only need four items to season: salt, pepper, olive oil and butter. That’s it. Don’t over-think this: you want the natural flavor of the meat to stand out.
Rock salt or flavored gourmet sea salt should be combined with coarse ground pepper and mixed together. Apply to both sides of the meat and allowed to rest for at least 30 minutes prior to cooking. This brings the steak up to room temperature so it cooks evenly and allows it to absorb some of the flavor from the salt. Trust me, my family raises cattle for a living, I know what I’m talking about here, flavorful salts and pepper is all seasoning you need for great flavor. If you have a good piece of beef you’re starting with and you cook it right you should be golden if you follow this method.
PRO TIP:Season the steak and let it rest for 30 minutes prior to cooking. This helps it absorbs some of the flavor from the salt (also helps with searing) and cook more evenly.
Step #3: Sear the Steak
Grilling the perfect steak becomes much easier once you learn to sear your steak. Professional steakhouses have insanely hot broilers – some burn up to 1,700 degrees Farenheit – in order to sear the outside of the steak.
Cooking steaks at home you probably don’t have that luxury even if you do have an infrared burner on your grill, however you can put a nice sear on it using the right technique, which will lock in the flavors and the juiciness of the steak. Within reason – you really cannot add too much salt to steak – it creates a delicious outside crust and helps the steak retain its natural juices.
You’ve really got two options when searing a steak
Option #1: If you have a good infrared grill, searing steaks on the grill should be no problem.
For reference I have a $300 Kenmore grill with infrared on one side and a regular gas grill on the other (I prefer a regular/infrared combo vs all infrared). I’m telling you this so you realize that you don’t need a hugely expensive grill to cook a great steak. Any grill that gets hot and puts out consistent temperatures will work. I tweaked the gas intake a bit (don’t do this at home) so mine gets up to about 450 degrees on the regular grill side and about 750-800 degrees on the infrared side. It’s actually so hot I forgot one cold day to pull it away from the window and it cracked the window pane, now that’s hot! As long as you can get above 600 or so on your infrared you should be able to give those steaks a good sear. Go get a heat gun and point it at the grill if you’re unsure and want to know the exact temperature in there.
Turn the infrared up all the way up and make sure it’s all warmed up before doing anything. When it’s ready toss the steaks on there for 30 seconds a side, leaving the top open while searing the steaks. Leave them in just long enough that they are brown with some nice grill marks. Then allow them to sit while you sear the rest of your steaks.
Option #2: If you have a charcoal or standard grill. You need to pan sear the steaks ahead of time.
In order to get a good sear you need a good pan. Get your pan really hot. Coat the steaks with olive oil and sear them 45-60 seconds a side and then set each to the side to rest while you cook the other steaks, then move to Step 4. (be sure to let excess oil drip off; too much will cause flare-ups on the grill)
Step #4: Grilling the Perfect Steak
Make sure the grill is good and hot, and immediately turn it down when you add the steaks, just a bit. When grilling the perfect steak, I like to run my grill around 360 degrees with the lid closed, I know some other great chefs that cook ata higher temperature but with the grill open. What it really comes down to is how hot your grill gets and personal preference. One other thing I like to do is if I’m cooking a smaller portion I shut off one burner and turn my other two burners to max. Then I put my steaks on the portion without the flame. It’s unconventional, but my steaks are always grilled to perfection and I rarely have flare ups. Even with one burner off I can still maintain about 380-400 with the lid closed and only 2 of the 3 burners on, something to tyif you have multiple burners on the grill.
PRO TIP: If you have a gas grill and multiple burners, try turning down the burners on the portion where the steaks are, and up the burners on the other side. It will lead to less flare-ups.
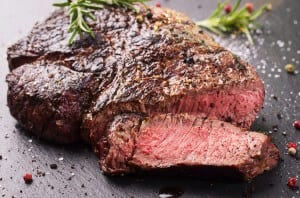
Great steaks should be cooked, not overcooked. Rare to medium is acceptable; anything beyond that is a sin against steak. Pros check temperature by feel – if the steak feels like the skin between your index finger and thumb, it’s a nice medium rare and ready to come off. No joke, my brother-in-law taught me this, it really works. Of course, meat thermometers are the easiest way to tell (125 – 135 degrees Farenheit is ideal).
And of course…
Step #5: Let the Steak Rest
Do not skip this step! Many backyard BBQs have been ruined by over-eager grillers. When your steak is on the grill, the proteins constrict and squeeze the juice out. By letting your steak rest for five minutes – either on a plate or cutting board – it allows the juices to be reabsorbed by the meat (which makes it taste a whole lot better, too!) Finish with thin slice of butter melted on top for a savory steak that will make your mouth water.
As you can see, grilling the perfect steak is quite easy to do once you know how to do it. All you need to do is follow these tips and make sure you have the right tools for the job. I hope this has been helpful, now go out into the world and grill great steaks! And now… I will shamelessly plug our large selection of grilling accessories available at HomeWetBar.com. Get one of the grill seasoning sets if you get nothing else, or maybe a new cutting board for cutting and displaying those steaks! Or some grill salts from Omaha steaks I use alternate between the tried and true and different quality grill salts like the ones from Omaha steaks. Of course you don’t have to have them, but they sure make grilling the perfect steak a lot easier! What tips do you have for cooking steak? Let us know in the comments below!
Keith Winter is renowned gift expert. His gift collaborations and designs have enriched over 1.3 million lives. He has a unique insight into the art of gifting, with his 20+ year history. In 2023 he achieved certification in the “The Art of Luxury” from the prestigious Parsons Designer School of Paris and has participated in design workshops at Chanel Paris. He has appeared on TV shows and collaborated with multiple brands as a gifting expert. Keith has a reputation for unmatched knowledge in finding gifts that leave a lasting impression.
MORE GIFT IDEAS:
Scotch Cocktails: The Sparkling Sand For those looking to upgrade the basic scotch and soda, we've created a new twist that's ready to keep you…


 Step #5: Let the Steak Rest